How to Manage Multiple Companies & Clients in One Place – Using RoHoster Dashboard
Managing multiple clients and companies can feel messy, especially when you're running multiple projects or businesses at once. But with RoHoster’s Billing Software’s Dashboard, all these things become super simple for you to manage your business. Whether you’re a freelancer, an agency, or a business owner with one or more than one companies, RoHoster gives you an absolutely easy way to manage everything in one place—for free!
In this guide, we’ll show you step-by-step how to manage multiple companies and clients using the dashboard of RoHoster’s Online Billing Software.
Step 1: Log In to Your RoHoster Dashboard
Visit Rohoster’s official website at www.rohoster.com
Click on “Login” from the top menu.
Enter your phone number and password (or register if you’re new).
You’ll be taken to your dashboard, which is very user friendly and easy to understand.
Step 2: Add Your Company Details
Before creating invoices, it's important to add your company information, so you can choose your company’s name for which you are generating the invoice.
Here’s how:
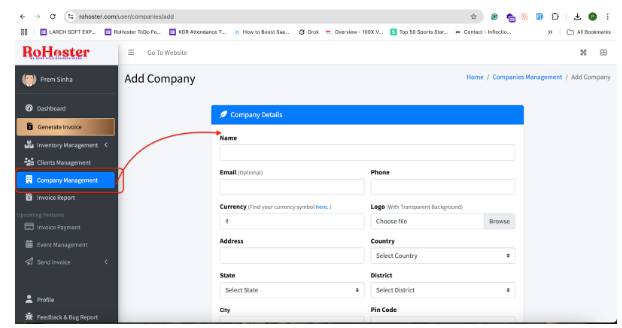
From the left sidebar, click on "Company Management".
Click on “Add Company”.
Fill in all the basic details: company name, address, GSTIN (optional), phone, email, etc.
Click “Save”.
📌 Tip:
You can add multiple companies and manage them separately. This is perfect if you run more than one business or want to handle client billing separately.
Step 3: Add Clients to Your Account
Once your company is added, now it’s time to add the clients you’ll be invoicing. Since you may need to generate multiple invoices to same clients, this process will help you to save time to avoid adding same details again and again. You simply need to add once and you can easily choose the client’s name while generating the invoices.
Steps to add a client:
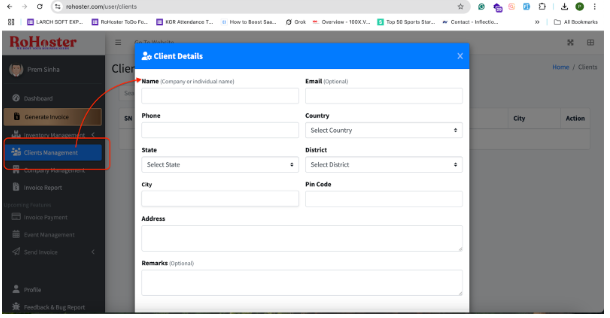
Click on “Client Management” in the sidebar.
Hit “Add Client”.
Enter your client’s name, company (if any), email, phone, and address.
Click “Save”.
📌 Pro Tip:
With RoHoster Billing Software, you can manage unlimited number of clients for free!
Step 4: Add Your Products or Services (Inventory)
If you provide services or sell products, this step will save you a lot of time later as you just need to add your products and services details once, and can easily select the product or services while generating the invoice, software will automatically fetch all others details quickly, so that you can generate the invoice easily and quickly.
Steps:
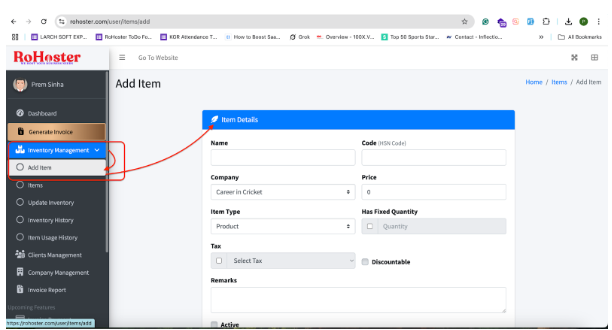
Click on “Inventory Management”.
Select “Add Items”.
Enter product name, price, unit, and optional description.
Save it.
✅ Now your product/service list is ready to use when creating invoices!
🧾 Step 5: Create Invoices for Any Client & Company
With your companies, clients, and inventory ready, now you can create invoices in just a few clicks.
How to create an invoice:
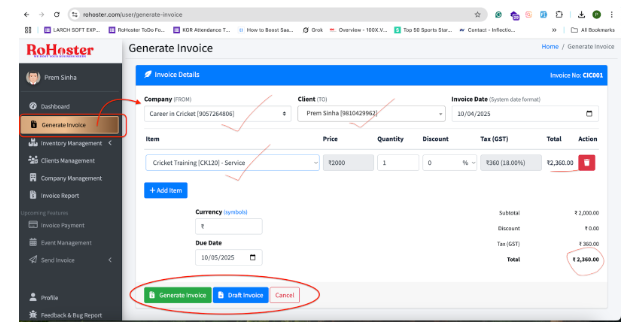
Go to “Generate Invoice”.
Select the company you want to invoice from.
Choose the client you want to bill.
Add your products/services from your inventory.
Add discounts, or currency if needed.
Save the invoice as a draft or finalize it by clicking on “Generate Invoice”.
🔁 You can also keep adding payment records or mark invoices as partially/fully paid later.
🖨️ Step 6: Download or Print Invoices (PDF)
Right now, you can print your invoices and save them as PDFs.
Open your invoice.
Click on “Print”.
Use the print window to save as PDF or take a hard copy.
📢 Note: The share by email/WhatsApp feature is coming soon!
📊 Why This Is Helpful for Businesses
✅ Manage multiple companies and switch between them easily
✅ Keep all clients and invoices organized
✅ Track inventory, products, and services in one place
✅ Draft and finalize invoices when needed
✅ Record multiple transactions in one invoice
✅ All FREE and super easy to use!
Final Thoughts
RoHoster is not just another billing tool. It’s a complete solution for freelancers, agencies, and growing businesses. With just one dashboard, you can manage multiple companies, clients, inventory, and invoices — without getting lost in spreadsheets or paperwork.
Ready to simplify your business?
👉 Login Now to RoHoster Dashboard
And start managing your business like a pro!
Simple & Compound Interest Calculator
Calculate your simple and compound interest easily for smarter financial decisions.
Try It NowOnline Invoice Generator Tool
Create customized, professional invoices instantly. Quick, easy, and secure.
Try It NowCountry Details Checker Tool
Instantly get detailed information about any country, including its ISO codes, capital, currency, and more.
Try It NowPassword Generator Tool
Generate strong, random, and secure passwords instantly. Customize length and complexity to protect your accounts.
Try It NowXML Sitemap Generator Tool
Create SEO-friendly XML sitemaps quickly and easily by using the website URL.
Try It NowSEO Search Optimization Checker Tool
Optimize your website's SEO performance effortlessly. Analyze title tags, meta descriptions, and keyword density to enhance your visibility on search engines.
Try It NowFree Keyword Density Checker Tool
Analyze keyword frequency in your content with our free tool. Improve SEO by ensuring balanced keyword usage and avoid overstuffing for better search engine ranking.
Try It NowSERP Snippet Preview Tool
Preview your web page’s SEO title, meta description, and URL in a real-time search engine results page (SERP) format. Optimize for higher click-through rates and better rankings.
Try It NowResize Image Compressor Tool
Optimize your images for faster loading times and improved web performance. Compress, resize, and convert images without losing quality.
Try It NowRemoving Backgrounds Image Tool
Easily remove the background from your images in just a few clicks. Perfect for creating transparent backgrounds for any project.
Try It Now